Monthly Archives

December 2018

  • How to Make Kid-Safe Bath Bombs (with a Hidden Surprise!)

    When 6:30 pm comes around, our nightly routine begins with a bath. Now, I can buy all the bath toys in the world for Rylan, but nothing is as entertaining to him as a fizzy bath bomb.

    Usually I get suckered into buying these from Target because they have little keychains in the center, but they are a tad overpriced for something that will fizz away in 30 seconds. So this weekend, we made our own kid-safe bath bombs with a hidden treasure inside! See how we made them below!

    Just a few drops of essential oils provides added aromatic and therapeutic benefits.

    DIY Kid-Safe Bath Bombs (with a Fun Surprise Inside!) | Rock It Mama | Learn how to make these DIY kid-safe bath bombs, made with essential oils and a fun surprise inside. Visit the blog for full instructions!

     You Will Need:

    • 1 cup baking soda
    • 1/2 cup cream of tartar OR citric acid
    • 1/2 cup epsom salt
    • 1/2 corn starch
    • 2 tbsp jojoba oil/V6 oil/coconut oil/almond oil
    • 3/4 tsp water
    • 2 tsp essential oils (we used Young Livings Lavender and Peace & Calming)
    • Mold (Easter eggs, ice cube tray, muffin tray will do)
    • Food coloring
    • Little treasures (optional)

    Directions:

    1. Whisk together dry ingredients
    2. Mix and stir together water, essential oils, and oil of choice. You will not add food coloring yet.
    3. Combine both dry and wet ingredients by slowly dropping wet ingredients into the bowl and stirring immediately. You do not want to go to fast or pour too much or else it will begin fizzing and your mix will be ruined. You want to continue adding wet ingredients in until you can pack the powder into your hand. If you need to, add sprays or drops of water to get the consistency right.
    4. Separate your powder into bowls and add food coloring.
    5. Firmly pack your mixture into your mold and place your hidden treasure inside once you get to halfway point of your mold. Continue to pack and fill all holes. Set aside for 24-48 hours (we did about 36 hours).
    6. Each bath bomb is enough for one bath.

    DIY Kid-Safe Bath Bombs (with a Fun Surprise Inside!) | Rock It Mama | Learn how to make these DIY kid-safe bath bombs, made with essential oils and a fun surprise inside. Visit the blog for full instructions!

    There are so many variations you can do when making your bath bombs. You can use different molds to create alternative shapes, you can change up the colors and scents as well. This is a great activity that gives your child the freedom to explore their options. Rylan decided he wanted Christmas colors (red and green), Lavender and Peace & Calming, and a few of his favorite rocks in the center!

    See how we made our surprise bath bombs below!

    This was so simple and fun to do together that I don’t think we will be spending anymore money on those ones at Target. And…with a few small adjustments, I’ll probably be making some Lush-inspired ones for myself!

    Do you think you will try this project? Let us know if you do!

    PS. If you enjoyed this fun activity with kids, you might like this one too!

    1
  • Sugar Cookie Truffles – An Easy Holiday Treat

    Ah, the holiday season. My favorite time to indulge in every sweet imaginable. If you’re like me, you’ll have a million cookies, cakes or pies left over after Christmas and a few good pounds to show for it. I came across the recipe for Sugar Cookie Truffles while attempting to find a purpose for some extra sugar cookies I made and was, quite frankly, tired of eating. The end product was so successful I plan to save a few cookies to make truffles every year! These delicious treats are basically Christmas goodness rolled up in a small, delectably edible ball AND as if you needed another convincing reason to make them, they can be used as cake pops. Yum!

    Ingredients:

    • 2 cups sugar cookies (or 12 cookies)
    • 4 tablespoons cream cheese
    • 2 cups white chocolate melting wafers
    • Sprinkles for decoration

    Directions:

    1. Line cookie sheet with parchment paper.
    2. Place sugar cookies in a food processor and process until cookies turn into fine crumbs. Add cream cheese and process again until well-combined and mixture can be pressed into ball.
    3. Shape mixture into balls about 1 in. in diameter. Place on prepared cookie sheet and put in freezer for 15-20 minutes.
    4. While truffles freeze, melt white chocolate.
    5. Remove the cookie truffles from the freezer. Using 2 forks, dip and roll chilled truffles one at a time in white chocolate coating. Return to line sheet and QUICKLY top with sprinkles before the white chocolate cools.
    6. Store in an air tight container in fridge.

    Tips

    • I used a basic sugar cookie mix and baked the cookies as instructed. Hard sugar cookie recipes are better for the truffles than soft.
    • Make sure to add sprinkles immediately after the truffle is dipped into the chocolate to ensure that they stick!
    • Here are some great tips for melting chocolate.

    Now you’re ready to go try out some Sugar Cookie Truffles of your own!

    Tasty, versatile, no bake and easy to make, they’re great for a unique dessert or a simple sweet after dinner. Push a stick into the bottom and you’ve got a holiday cake pop. Happy tasting!

    Sweet tooth kicking in now? Be sure to try our homemade Air Fryer Donuts!

    Sugar Cookie Truffle
    Prep Time
    25 mins
     
    Ingredients
    • 2 cups (or 12 cookies) sugar cookie
    • 4 tbsp cream cheese
    • 2 cups white chocolate melting wafers
    • sprinkles for decoration
    Instructions
    1. Line cookie sheet with parchment paper.

    2. Place sugar cookies in a food processor and process until cookies turn into fine crumbs. Add cream cheese and process again until well-combined and mixture can be pressed into ball .

    3. Shape mixture into balls about 1 in. in diameter. Place on prepared cookie sheet and put in freezer for 15-20 minutes.

    4. While truffles freeze, melt white chocolate.

    5. Remove the cookie truffles from the freezer. Using 2 forks, dip and roll chilled truffles one at a time in white chocolate coating. Return to lined sheet and QUICKLY top with sprinkles before the white chocolate cools.

    6. Store in air tight container in fridge.

    0
  • DIY Scrabble Tile Christmas Tree Ornament

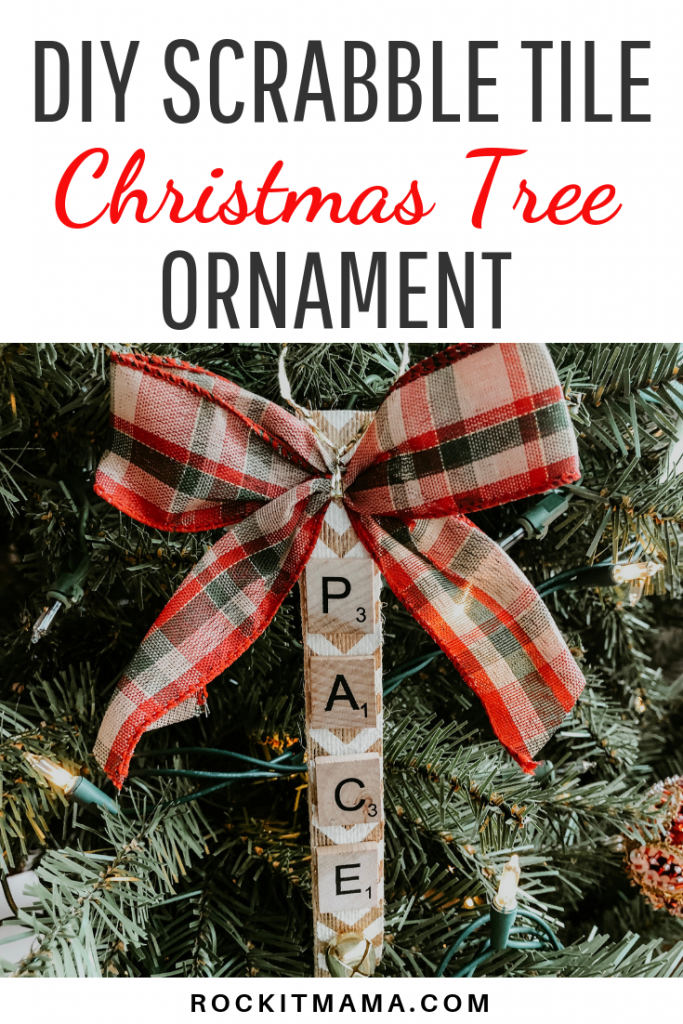
    I’m going to explain the inspiration for the DIY Scrabble Tile Ornament in the hopes that if you’ve found yourself in a similar predicament I can solve it for you. While browsing the personalized “named”ornaments in the Target Christmas section I couldn’t find any for my sons Finley and Pace. Although I love that their names are unique (for now) it does make finding personalized products more difficult.

    Thats when I turned to Pinterest and found a similar craft, but decided to put my own spin on it. I’m thrilled with how cute they turned out for how easy they were to create. Cute, spirited and perfect for anyone in your life with a special name (like a term of endearment for Grandma, etc) the DIY Scrabble Tile Ornament is a simple craft that you can keep for yourself or gift to someone else. Also, I love that it pays homage to a timeless game that I grew up playing!

    You will need:

    • Glue Gun
    • Scrabble Tiles
    • 1 in. Ribbon
    • Bows with twist tie
    • Small Bells

    Directions:

    Place the tiles for the name you’ve chosen on the ribbon so you will know how long you need to cut it. I left about 3 inches from the first letter to the top of the ribbon to have plenty of room for the bow. I gave about 2 inches at the bottom to provide space for the bell. Use the glue gun to adhere the tiles to the ribbon. Space them as desired. No need to steal scrabble tiles from the game. You can purchase them here.

    For the bow, I purchased a swath of ones similar to this that I found at Michael’s. I would imagine you could get them from any craft store, just be sure they have the twist tie because that is the piece that will be used to hang it on the tree. Once the glue has dried for the tiles, glue the bow to the top of the ribbon and the bell at the bottom. Make sure the twist tie is at the top so it can be used as the hanger.

    Viola! The DIY Scrabble Tile Ornament. An excellent small gift for a friend or coworker and great as a quick stocking stuffer.

    If you found this article helpful, check out our 50 Favorite Christmas Gifts Under $10!

    0